Have you ever considered making your presentation titles or logos a bit different, but found plain, straight text felt too dull? If yes, you might try using curved text in your PowerPoint slides. Knowing how to curve text in PowerPoint enables you to shape words creatively, making your presentation more engaging and visually appealing.
If you struggle with curving text or customizing it in PowerPoint, this guide will walk you through a step-by-step procedure, along with design tips to ensure your slides remain sharp and professional.
What is and Why Use Curved Text in PPT?
In PowerPoint, curved text refers to text that has been formatted to follow a curve, circle, or wave instead of sitting in a regular straight line.
This feature functions as a design tool that you can use to make slides more appealing to your audience. For example, creators often use curved text in PPT around logos and standout designs.
There are various kinds and styles of curved text in PowerPoint, but the most common ones include:
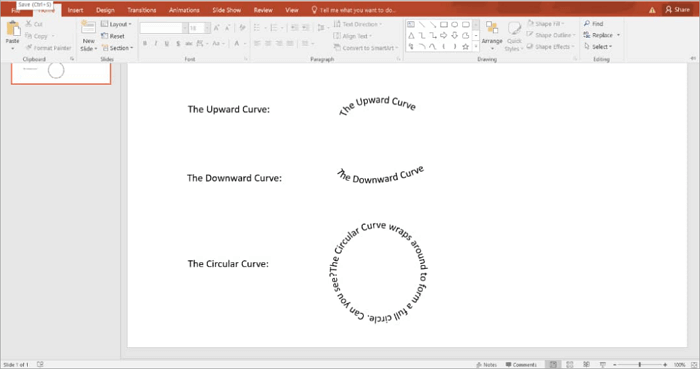
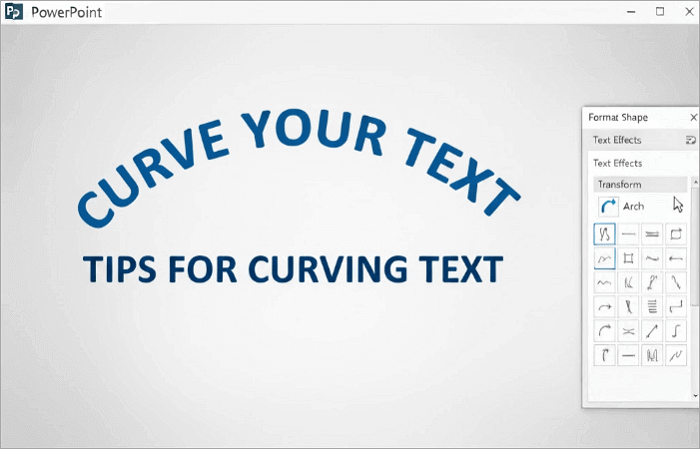
➤ The Upward Curve (Arch up): In this style, the text bends upward in a smooth arc, imitating the shape of a rainbow.
➤ The Downward Curve (Arch down): This is the direct opposite of the upward curve, with the text bending downward, imitating an inverted rainbow shape.
➤ The Circular Curve: Text in circular curves wraps around to form a full circle. Usually, the text curves upward, making it easier to read as it goes in a circular pattern.
Using curved text in PowerPoint has several applications, including branding, event flyers, educational slides, and even product presentations. Marketing teams also use arched text in PowerPoint to design standout event banners and product highlights.
How to Curve Text in PowerPoint Step by Step
Now, let’s go through the way to create curved text in PowerPoint.
1. Make Curved Text in PowerPoint
If you are new to creating slides, the easiest way to curve words in PowerPoint is to use the built-in Transform tool. You’ll be able to access and use this tool for your presentations on both Windows PC and Mac.
While this tool is very easy to use, you need to ensure you choose the right font and the perfect size. You’ll want to go for fonts like Sans Serif, Calibri, Open Sans, Montserrat, etc., as they don’t appear distorted when arched.
📝 Here’s a step-by-step guide on how to arch text in PowerPoint using the “Transform” tool:
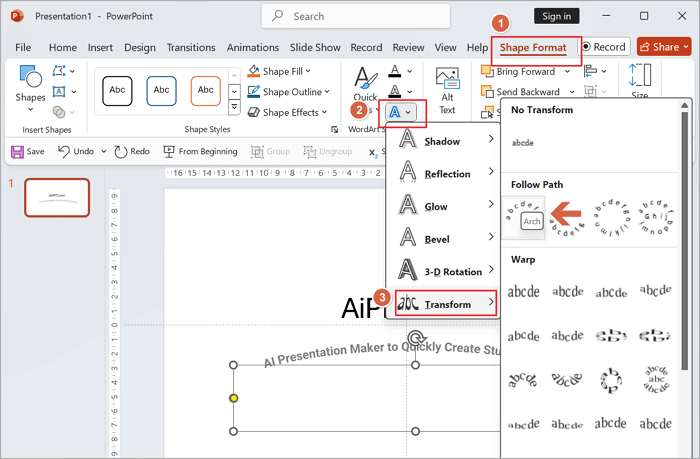
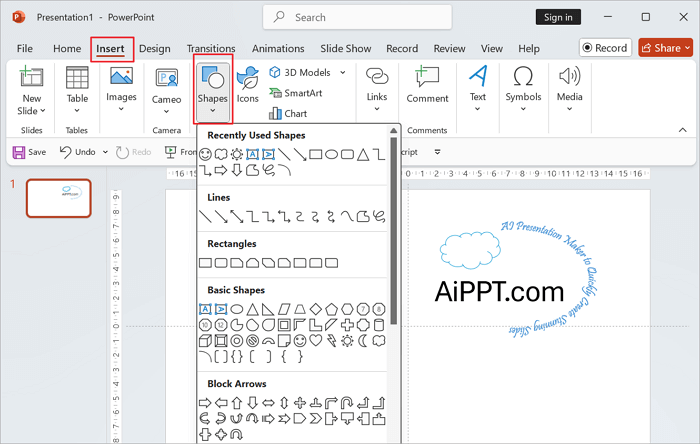
Step 1: Open your slide and insert a Text Box from the Insert tab.
Step 2: Type the words you want to curve.

Step 3: Highlight the text, then go to the Format tab.
Step 4: Select “Text Effects > Transform” from the menu.
Step 5: Under the Warp section, pick an arc option.
2. Round Text in PowerPoint for Circular Effects
Sometimes you may want to use round text in PowerPoint for designing logos, badges, seals, or decorative headings. In that case, you will be making use of a different method than the one we covered earlier.
When creating this kind of text for your slides, pay attention to alignment and spacing so the design remains balanced. Ensure the text follows the circle’s shape evenly, to avoid overlaps or awkward gaps.
📝 Follow these steps to make a circular effect on your PPT slides.
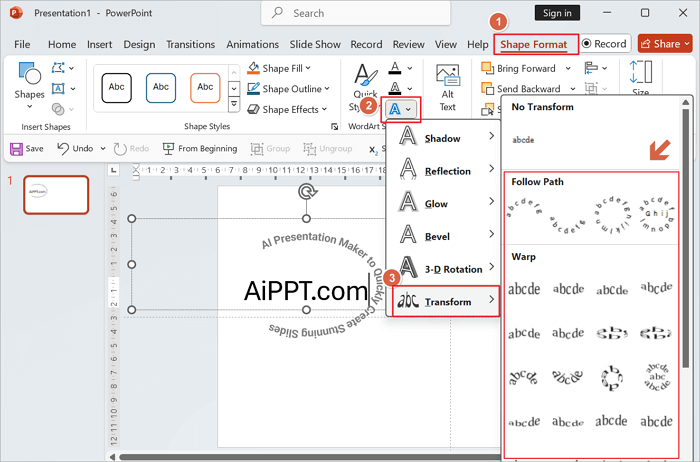
Step 1: Open your slide and insert a Text Box from the Insert tab.
Step 2: Type the words you want to curve.
Step 3: Highlight the text, then go to the Format tab.
Step 4: Select “Text Effects > Transform” from the menu.
Step 5: Under the Follow Path or the Warp section, pick a round option.
3. Customize the Style of PowerPoint Curved Text
Curving text is more than just knowing how to bend words in PowerPoint. Text Effects offers several features you can utilize to style your text and make it blend with your design theme. With customization, you can get the most out of your curved text.
There are different ways to customize the style of curved text in PowerPoint, including:
1️⃣ Change the font and size – When trying to curve font in PowerPoint, avoid overly decorative fonts that may distort along the curve. You can use elegant fonts for formal slides and keep playful fonts for creative ones.

2️⃣ Adjust colours and effects – Go to “Format > Text Fill” to change colours, add gradients, or use shadows for depth.

3️⃣ Combine with shapes or icons – Go to “Format > Insert Shapes” place your curved text around logos or circular graphics.
Tips for Curving Text in PowerPoint
Yes, curved text can improve the look of your slides and make them more engaging, but you should know how to get the most out of the feature.
Here are some practical tips for curving text in PowerPoint:
🌟 Avoid overuse: You want to keep it simple and reserve curved text for only titles, logos, or other designs rather than full paragraphs.
🌟 Use larger font sizes: Smaller texts often appear distorted when arched. I’ve also noticed that sans-serif fonts curve more smoothly than serif ones, so stick with cleaner typefaces.
🌟 Check readability: Ensure there is enough contrast between the curved text and the background so it stands out.
🌟 Balance with other design elements: You can further improve the appearance of your curved text by combining it with icons, logos, images, or shapes.
🌟 Test different effects: You can try out the arc or wave formats to see which matches your style best.
Generate a PPT with the Advanced Font Effect Online
What if I told you there’s a tool you could use to generate PPTs using AI? The tool is AiPPT.com, and it offers a quicker way to design slides.
With its AI-powered outline generator, all you need to do is type in your topic, and AiPPT comes up with a logical framework for your presentation. You can also upload files in different formats, and the tool will automatically turn them into slides.
Beyond the basics, this slideshow maker also offers more than 200,000 templates with advanced fonts and modern layouts for you to choose from.
📝 If you’re wondering, here’s how to generate PPTs on AiPPT:
Step 1: Visit AiPPT and sign up or sign in.
Step 2: Select the “New Project” button to start making your presentation.

Step 3: Enter a theme/topic to start generating your slides. Then, review and modify the outline generated by AiPPT.

Step 4: Scroll down and select a theme for your slides. Then click on “Generate”.
Step 5: Edit the presentation slides, and then you can choose to share the PowerPoint with others through a link or download it in PPT/PDF/image formats.

And that’s it! You get your slides in seconds to minutes, depending on how much you’re generating.
Conclusion
Knowing how to curve text in PowerPoint allows you to be more creative when designing your slides. Whether you need arched titles, circular logos, or stylish word effects, PowerPoint makes it easy to customize to your needs.
And if you want advanced designs quickly, AiPPT is a great alternative. All you need to do is enter your topic, and the AI generates a complete presentation for you. AiPPT gives you plenty of font options and ready-made layouts, so you can put together professional-looking slides in very little time.
FAQ on Curved Text in PowerPoint
Still have questions about curved text in PowerPoint? Here are answers to commonly asked questions on the topic:
1. Is curved text available in PowerPoint online?
Unfortunately, there is no way to create curved text in PowerPoint online due to its limited formatting tools compared to the desktop app.
The only way to use curved text in PowerPoint online is to create it on the PowerPoint desktop, where the “Transform” feature is available, or on an external tool like Canva and import it to PowerPoint Online.
2. Can you make words curve in PowerPoint on Mac?
Yes, you can curve words however you like in PowerPoint on Mac. The steps are quite similar to Windows: Select your text, go to “Format > Text Effects > Transform”, and choose from the different text styles available.
Although the interface may look slightly different from Windows, the features work the same way. You should also note that certain fonts might curve differently, so you should test a few options first before making your choice.
3. How can I make my text into a circle shape?
To make your text into a circle in PowerPoint:
- Start by typing your words inside a text box.
- Next, select the text
- Go to “Format > Text Effects > Transform”.
- Then choose a circular effect from the options.
Your text will immediately wrap around the inside of a circular path. You can adjust the spacing and alignment of the curve by dragging the text box handles until it forms a perfect circle.